Easy DIY Braiding Techniques for Hair

Written by Andrea Haynes

Hair braiding is a beautiful technique for both the style and health of your hair. But chances are you’ve experienced a bit of a learning curve with the three-strand braid, a technique that so many people were introduced to growing up. Do you remember the feeling you had once you finally mastered it? Like tying your shoes, once it clicks, it clicks. But transferring this technique to yourself for DIY braiding can be a bit trickier.

Here are a few easy tips and tricks for braiding your own hair that make the process easier. From beginners to advanced braiders, use these steps to increase your braiding skills while making your hair luxurious and healthy along the way.

Different Ways to Braid Your Own Hair –The Three-Strand Braid for Beginners

Stylist Braiding Girl's Hair In Beauty Studio

The biggest takeaway for the three-strand braid is allowing yourself some grace. When first learning the art of folding three strands of hair over each other in a pattern, it’s important to let yourself make mistakes and enjoy your own process. I promise you’ll get it!

So where do you begin? It’s helpful with this braid to begin on someone else, then once you feel like you’ve got it, transfer the technique to yourself. But for the sake of this tutorial, we will begin with braiding on yourself. 

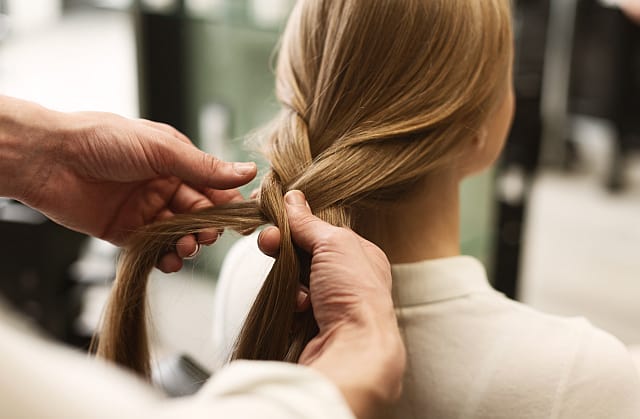
Steps for the Three-Strand Braid on Yourself

Begin by taking a 2” wide section of hair near your face. Use a clip to pin the rest of the hair out of the way. Do not practice in front of a mirror.

The basic 3-strand braid – video by Andrea Haynes
  1. Divide the section near your face into three equal-sized strands.
  2. With one hand, pinch 2 of the strands while keeping them separate, and hold the third strand with the other hand.
  3. With the hand holding the single strand, use your loose finger (maybe the middle one) to reach and grab the middle strand and cross it over the top of the one on the outside. Now two strands have switched places.
  4. Now take the opposite hand and do the same motion, pulling the new middle strand over the top of it. The outer strand has changed places with the middle strand once again.
  5. Repeat this pattern working between your left and right hands until you see the braid form!

The classic three-strand braid creates a beautiful texture and can add a lot of style to your look. There are other types as well with ethereal qualities worth looking at.

Steps For the 2-Strand Braid or Double Fishtails

This is a great braid if you’re looking for something gorgeous but contoured to a minimalist’s aesthetic. The overlay of each strand can look more intricate than the three-strand braid, making it perfect for a party or night out.

While the steps are simple, getting a good grip on the hair might be the only area where there is a learning curve. Keep practicing, each time you do, you’ll get comfortable with the hold.

French Braiding Styles

Easy Steps for the 2-strand Braid or Dovetail/Fishtail on Yourself

  1. Start by parting your hair down the middle to create two equal amounts of hair.
  2. Begin near the front of the part on one side and collect the hair as you go into a twist until you end up twisting all the way down to just behind the ear. Secure with a small rubber band.
  3. Now for the fishtail part. Near where you just placed the rubber band, divide the loose hair below it into two equal sections. These are now called sections 1 and 2.
  4. On the outer side of section 1, take a very small piece of hair and cross it over the section you took it from, landing on the other side in section 2. Hold it with your other hand.
  5. Then, from section 2, take a small piece of hair and cross it over the section you took it from, landing in section 1. This crisscross action can be repeated all the way down until you have a beautiful fishtail braid.
  6. Gently secure with a rubber band at the end then begin to lightly pull at the crisscrosses until the braid loosens and expands in size.

Intermediate French 3-strand and 2-strand Braiding

Once you’ve gained the ability to braid, the next step is learning to do a French style. This means the braid is attached to your head. The movement follows the same pattern as a basic braid but incorporates extra strands from different parts of the head as the pieces are braided over each other.

French 2 strands braid

It is an intermediate braiding technique and builds off the foundation of being able to do a simple 2 or 3-strand braid. The results can be absolutely stunning, so practicing this is worth your efforts.

Steps for a Classic Single French Braid

  1. Start by brushing your hair back to remove the part.
  2. Take your two index fingers and place them on your temples, then slide them slowly up, landing about 2” past your hairline. This is your starting section.
  3. Divide the starting section into 3 equal pieces. These are strands 1, 2, and 3 now. It’s important to keep these 3 sections clean and evenly divided.
  4. Take the middle strand number 2 and cross it over strand number 3. The two strands have now switched places.
  5. Now before taking strand number one and crossing it with the middle strand, you’re going to slide your index finger and scoop up another section of hair, adding it to strand number 1 before the crisscross happens.
  6. This is the motion that will be repeated until you’ve braided all the way down the end of your hair. You’ll scoop in slices of hair to add in each time one of the outer sections of hair crosses over the middle piece.
  7. Make sure to view the video attached to this piece so you can see the art of the French braid. It’s a very visual process!
Beautiful girl with hair braided with a French braid

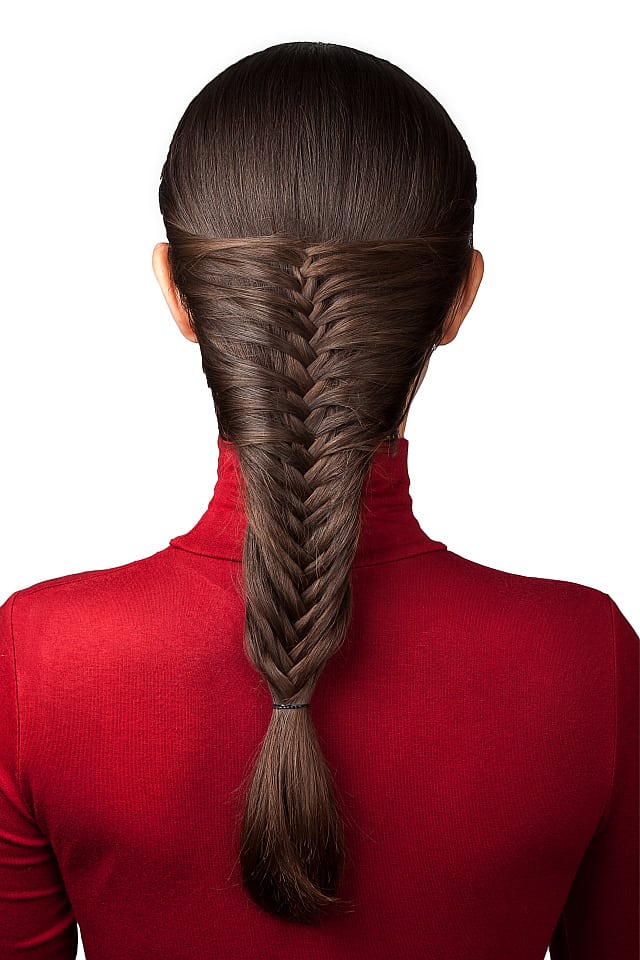
French Fishtail Advanced Technique on Yourself

The steps for a French fishtail are similar in terms of the pattern and the scooping to add in hair as you go. However, French fishtails look more beautiful than bubble braids. This means you pull the crisscross under the middle piece, instead of over it, resulting in the braid “popping out” or looking raised on the head.

The fishtail pattern is easier to see this way as it enhances the details of the look. It’s a more difficult process and takes time to master. So don’t give up, anything is possible when you want it.

hairdresser do hair braiding in salon

6 Types of Highlights and Color Techniques You Won’t Want to Miss

Written by Andrea Haynes

Summer is just around the corner, and no doubt that urge to highlight your hair peaks every time the sun comes out. But before you dive right into the salon and say “make me blonde” you may want to know what you’re getting yourself into and why.

There are so many different types of highlights that this topic is not always easy to understand. Usually reading the language will be enough to throw you off, but then when you google images of balayage, foiliage, ombre, full foiled highlights, etc. things only get more confusing.

I want to help take out the blurry definitions and give you a solid understanding of the varied types of highlights so you can look sun-kissed or platinum in time for summer. And there’s no better time in 2022 than right now to get this process going.

Amazing Types of Hair Highlights to Choose from in 2022

1. Full or Partial Balayage

Full Blonde Balayage
Full Blonde Balayage by Andrea Haynes

If you’re hoping to get something very natural-looking that might only be a couple of shades lighter than your natural color, then balayage is a good option. Each piece is hand-painted with precision and just the right amount of saturation to give you the sun-kissed look of your dreams. So what exactly do you need to know about balayage? Just a few easy takeaways.

Balayage is a naturally “warm-color” producing process. If you like golds, warm browns, reds, honey, and champagne then this will fit your aesthetic.

What’s the Difference Between a Full and a Partial Balayage?

  • A full balayage covers all areas of the head, including the back underneath the crown down to the nape of the neck.
  • A partial only covers the upper portion of the head from the back crown to the upper portion of each side of the head.

Why should you choose a partial or a full balayage? Partial Balayage creates more “dimension.” It’s a higher contrast effect where there are naturally deeper lowlights created from your natural hair color. The takeaway is if you want high contrast with balayage, try a few partials in a row spaced 8-10 weeks apart.

Toners are often needed to soften the level of red, copper, orange, or gold that might be produced from the bleaching process. These warm color pigments live naturally in the hair and become exposed once the bleach does its job. So don’t be worried in the process. Your colorist knows what they are doing.

Toners are often needed every 6-8 weeks between services to keep the tone in the right color spectrum.

How often should you get a balayage per year? This will vary but on average people do 2-5 per year.

2. Foiliage

Full foiliage by Andrea Haynes
Full Foiliage by Andrea Haynes

When you hear the word foiliage, think bright blonde with an easy grow out. With this process, you get the best of two worlds: the brightness of “foiled highlights” mixed with the easy outgrowth of a balayage. @lo_Wheelerdavis is a luxury hair artist from California who specializes in creating high-contrast, rooty blondes. For inspiration, she is a good place to start. You’ll find everything about this look on her page, plus more.

So what do you need to know about foiliage?

  1. Using foils creates deeper saturation and heat when the product comes in contact with the hair. It’s a physically more intense process for your cuticles so take care of them in a few ways: get keratins, use hair masks 1-3x per week, try the Olaplex line, and stay regular with your upkeep.
  2. Foiliage is meant to be for high contrast. If you’re torn between foils and balayage, try foiliage.
  3. It is still a rooted look, so you are growing out your highlights easier, although still not as easy as a balayage.
  4. Often needs to be color melted post highlighting service.

3. Color Melt (NOT A HIGHLIGHT TECHNIQUE)

Often your foiliage, balayage, or foiled highlights will be followed by a color melt. Your colorist takes 2-3 colors and starts with the darkest toner at the root, then moving a couple of inches down at a time uses a slightly lighter toner for the mid-sections of the hair until the end is reached where the lightest toner is applied.

Example of Color Melt1
Example of Color Melt by Andrea Haynes

What do you need to know about a color melt?

  1. This is a toning process, not a bleaching or highlighting service.
  2. Color melting takes a lot of skills and expertise to do well. The use of three colors is slightly misleading as the color for each section as you move down in a gradient from dark to light will have multiple colors mixed in to achieve it. So for example, you’re using a dark color at the base of your hair and it could be mixed with 3 different colors to make it that shade. The same goes for the midsection color and the ends. It’s complex!
  3. It’s a conditioning process with certain brands. Some glosses act like an end-of-service shield, sealing down those cuticles and making the hair shiny and healthy-feeling.
  4. You may not need a color melt as often as you would a single toner.

4. Babylights

A good technique for the blonde that feels never quite blonde enough but still stays shy of platinum. The results of babylights are gorgeous and can be considered high maintenance.

babylights
Babylights by Andrea Haynes

So what are the key concepts for babylights?

  1. Long service. This process takes paper-thin sections and applies the bleach or lightening agent to them inside folded foils. Due to the tiny section size, the process can take a very long time. Bring a book and a snack!
  2. It’s high-maintenance blonding for a reason. You’re achieving the brightest blonde possible here just shy of a double-process platinum experience. This means to maintain that blonde, you’ll need to be booking regular touch-up services every 8-10 weeks.
  3. Aftercare is important. You’ve invested a lot of time and money into this process so taking care of it provides the best benefits. Remember to get keratins, use quality products and brands such as Kerastase, and create a solid product foundation. The foundation consists of your shampoo, conditioner, oil, and heat protectant. Make sure these are moisture-focused.

5. Double Process Blonde

Babe hair anyone? This blonding technique produces that iconic all-over single shade of blonde that symbolically screams “blondes have more fun.” (Don’t worry brunettes, your color symbolically screams the same thing, except it inserts “brunette” into the phrase).

What do you need to know about being a double-process blonde?

  1. Highest maintenance of all the blonding techniques. Time and money are important here as you’ll be in the salon for a long period of time per service. Then you’ll need to book touch-ups regularly. The harsh line that grows out is stark and getting your touch-ups is the best way to take care of it.
  2. You are depleting a lot of natural keratin on a regular basis so getting Express Keratins by Keratin Complex is a must.
  3. Make sure to tone regularly as well. If your original color was dark, your hair will want to fade to colors you might not love.
  4. Re-book touches up about every 6-9 weeks or so. This can be affected by how quickly your hair grows and how polished you want it to be. 

6. Copper Highlights

copper highlights
Copper Highlights. Photo credit by Andrea Haynes

 2022 is the year of gorgeous redheads, but not just any red. Copper-red is the look, and it’s a bit enchanting. The hues range in the spectrum from deep red-orange to pale strawberry blonde, but with copper undertones. How is this look achieved? For starters, no red color is the same so make sure to bring photos for your colorist so they can get a good idea of the copper shade you want. The look is typically achieved by doing a balayage, foiliage, or highlight and following that with copper shades of colored toners or hair dyes.

What do you need to know about highlighted copper-red?

  1. The look is not for everyone. And that’s ok.
  2. The more highlights you add in first, the more dimensions or contrast you’ll have. This also makes you lighter.
  3. It may not come across this way, but copper highlights are high maintenance. Red coppers fade quickly and will need a toner to refresh often.
  4. It’s fun! If you’re on the fence, this is the year to give it a try.

Just a simple tip, but you may want to go to a copper-red head for this service. No one knows reds like the redheads themselves. Scarlet and Co. in the Gold Coast of Chicago for example is owned by the most beautiful and talented copper-red colorist. Finding a place that specializes in reds is key.

The 5 Best Hair Dryers for Frizzy Hair and Hairdresser’s Tips for Smooth Blowouts

Written by Andrea Haynes

Chances are you felt the struggle of taming frizz. Maybe you fought that dry, dead winter air. You know, the kind that leaves your hair feeling like hollow straw. And it’s such a trap, isn’t it? You put in all that effort to get your hair looking good, only to throw on a beanie to cover that hay up.

Or maybe you’ve finally completed a perfect blowout, your arms are sore but you’re happy. Then, within seconds of stepping out into the summer humidity, poof! Your hair plumps up like a birthday balloon.

The frustration with frizz is a real concern for anyone wanting to maintain a certain style throughout the day. Brides come to mind right away given their styles need to last through thick and thin weather conditions, and on that special day, it needs to be for better not for worse. 

A young girl drying her frizzy hair

So what is one of the best ways to decrease frizz during styling? Starting with a solid foundation is the best place to begin. This means working with the right styling tool. Once you get this down, the rest follows including healthy, bouncy, shiny hair that lasts.

You might be wondering which tool can help fight frizz the most. It’s your blow dryer. If you want strong, healthy hair without spending hundreds on expensive side products, it’s time to throw out your old one or finally get the quality one your hair deserves.

What is Frizzy Hair and Why Do You Get It?

Frizzy hair is the result of a few different things. The most common culprit is dryness. Dry hair is the direct result of a lack of moisture which normally makes the hair supple, shiny, and even strong.

Your sebaceous glands are rooted in your scalp and produce a natural oil that acts as an elixir, coating your hair. Good natural oils, mean minimal frizz.

But as your body produces the oil it needs, there are natural and unnatural factors that strip your hair of these oils, causing dryness. A few of these factors include humid climate, harsh shampoos, hot water, bleaching, and permanent hair dyes (which lift the cuticle to deposit color molecules).

Frizz happens when you are over-styling with hot tools and not using a heat protectant EVERY time you heat style.

Finally, BAD BLOW DRYERS can be the main cause of frizzy hair. 

The Best Hair Dryers to Reduce Frizz

So if you want to give yourself an advantage over dry, frizzy hair, it’s time to look at some blow dryer brands that blow the competition away. Here is a list of brands that come highly recommended for avoiding that brittle dryness that can result in frizz.

This post contains links to Amazon. The publisher may get paid if You purchase something through the links without additional costs to You.

1. Dyson Supersonic Blow Dryer

If you were enamored with their ads, you’ll be even more in love with the actual product. This blow dryer has come along to revolutionize the hair industry and how you experience your hair. The design has been modified in a few ways that impact dryness. The motor has been placed in the handle instead of the head, keeping the weight distribution balanced. So you have more control over how close you hold the nozzle to the actual hair.

Then there’s the force of its wind power which drives the drying process. Instead of using heat that can split the cuticle, it uses the force of the wind to get it dry. The technology is innovative and new and it makes this dryer stand out when it comes to decreasing frizz with its “ceramic core.”

2. SRI Salon Dry Pro Hair Dryer

What’s special about this dryer is its use of red-light therapy or Infrared technology. Essentially what this means is that by using this type of light, you can heat/dry the hair from the inside out vs. the outside in. Blasting the hair cuticle with a regular dryer means the heat/air hits from the outside and can hurt the cuticle, which is why infrared technology is so beneficial.

It also uses ionic technology which means you get small molecules that are attracted to the charges on water molecules. When they connect, they make the water evaporate, meaning the hair will dry faster and with less damage.

3. The BaBylissPro Nano Titanium Portofino Dryer

This tiny but mighty device will leave your hair frizz-free and shiny due to its ionic technology. It sports a powerful motor to increase the dry time without compromising the integrity of your hair. This brand is trusted by professionals at large for its ability to decrease frizz and make hair look beautiful.

4. The Dyson Airwrap

The allure of the Airwrap is its detachable components that allow you to create volumized, symmetrical, frizz-free curls without getting confused while looking in the mirror. How many times have you wanted to create gorgeous waves, only to find it impossible to achieve with a regular hair dryer and round brush? The mechanics are physically complicated with normal dryers so the Dyson Airwrap gives you an advantage for silky smooth curls.

5. The Olivia Garden Ceramic + Ion Hair Dryer

As the name implies, this hair dryer uses Ceramic and ionic technology to keep frizz at bay. The ceramic element helps to lock in moisture, so your hair stays supple. And the ionic part means the water molecules get evaporated more quickly.

The Types of Hair Dryers You Should Avoid

For those of us who have experienced the dreaded hotel room blow dryer, you know exactly what it means when a blow dryer is “bad.” Your hair is not only full of static or “fluffy” once the job is complete, but it feels dry for days after. Hotel blow dryers can be some of the worst out there to use. So be careful and make sure if the dryer in the hotel is not named brand, avoid using it.

So why does this happen? Typically, it’s because these incredibly cheap dryers do not use ionic, infrared, or ceramic technology. Instead, they use sheer heat that has an effect like sandpaper when it comes in contact with your cuticles.

You may have also noticed a faint burning smell when using a blow dryer that damages the hair. It could be related to an electrical issue, or it could be that it’s actually too hot on your hair. Either way, time to get a new dryer.

How to Protect Your Hair from Frizz and Dryness in the Blow-Drying Process

Hairdresser applying styling spray to client's hair

Naturally, blow-drying your hair with a quality tool has everything to do with the health of your hair. But to increase your chances of having a good hair day,  both products and good techniques come into play.

1. Use a quality heat protectant

There are a few rules of thumb to keep in mind with your product usage. The first is to always use a cream-based or spray-on heat protectant to keep your frizz at ease.

What’s the difference between the two? Cream-based heat protectants are going to provide full-coverage protection during the blow-dry. It’s very similar to the way a full-coverage foundation works when you apply makeup vs. a partial one. For people with highlighted hair or very damaged hair, these work best. My all-time favorite cream-based heat protectant is the “Resistance” by Kerastase. It smells divine and truly makes a difference to your hair.

But for people with relatively healthy hair who want volume, a spray heat protectant might be better. Oribe sells one that refreshes and revitalizes hair. It’s lightweight with all-natural ingredients and smells so good, that you can double it as a body spray.

2. Use a lightweight hair oil

In partnership with your heat protectant, you’ll want to use an oil with fast absorption properties. The best one on the market is the Elixir Ultime by Kerastase. This oil can be used on dry or wet hair and coats the cuticles without creating excess oil. If you’ve never used a heat protectant and oil together just before you blow-dry, get ready for a life-changing experience.

3. Use anti-frizz styling products

One more unique product that can help with frizz is the Impermeable Anti-humidity Spray by Oribe. There’s no other product like it on the market. It’s a de-frizzing agent that lasts for hours in your hair even while you face the outdoor elements. It’s one purpose? Simply defrizzes your locks and creates a barrier so that more humidity can’t enter.

4. Get a keratin treatment

Another great tip for faster blow-dry time and a decrease in frizz is to get regular Express Keratins by Keratin Complex. They are amazing at replenishing depleted keratin from the root to the tip of every single hair strand. It creates this weighted, plumped-up hair that responds better to the blow-drying process and leaves your strands frizz-free.

Step-by-Step DIY Blow Drying Techniques

There are many ways to go about blow-drying your hair, but which one is most effective in decreasing frizz? Remember, no matter how good your technique is, if your blow dryer is low quality, it will damage your hair. That’s the first thing to get right in these steps. Next is your methodology.

Follow these 2 methods for blow-drying to decrease frizz and increase volume, bounce, and shine. 

1. The Victoria’s Secret Blowout: Advanced Blow-drying technique

You’ll need Velcro rollers, a quality blow dryer, moisturizing products, clips for parting the hair, a 1 and ¼’ curling iron, and a 2” round brush.

This method gives you ultimate volume, gorgeous beach waves, and absolutely no frizz.

  1. The first step is to apply a heat protectant, a very small amount of oil, and some volumizing mousse by Kerastase while your hair is damp. Then flip your head over and place the nozzle of your dryer near the roots. Allow the dryer to move over the entire head so the heat is distributed evenly.
  2. Stop after a few minutes or the roots feel dry, then flip your head upright again. Take your comb and part a 2” mohawk section along the top of your head. Part out the left and right sides of the head.
  3. Take a round brush and grab a small section at the front of your forehead where your bangs would be. The section should be about the width of your round brush or slightly smaller. Begin by placing the round brush at the base of your scalp behind the first section of hair with the blow dryer pushing the air at the root in the front. Move the brush and the dryer together up the length of the hair.
  4. Then detach the brush and move it back down to the base of the hair and repeat this movement until the section is dried.
  5. When the section is dry, quickly take your large Velcro roller, and starting from the ends of the hair, roll your section down to the root. Continue this along the length of the mohawk section then move to the sides of the head. For the back of the hair, simply blow dry with the round brush, no need to set it with rollers.
  6. Once you’ve set all rollers, let your hair cool off for 10-15 minutes or until it’s cool to the touch, then remove the rollers.
  7. Apply a cream heat protectant and wave your hair with your favorite curling iron.
  8. Finish with Oribe’s Impermeable Anti-humidity spray.

2. The Quick Wave Blowout Method

You’ll need a quality blow dryer, a paddle brush, moisturizing products, and a 1-2” barrel curling iron.

  1. Begin by prepping your hair with the right products according to their directions. Use a quality heat protectant, a small amount of Elixir Ultime Oil, and a volumizing agent (either a mousse or a root lift spray).
  2. Flip your head upside down and tousle it dry. Begin from the roots and use your fingers to gently stretch the hair upwards while directing the blow dryer’s heat and wind power to the area in your fingers. Do this all over your scalp.
  3. Next, flip back up and take your paddle brush, and gently stroke a section of hair from root to tip as your direct the air over it. Do this motion until all parts of the hair are dry.
  4. Then apply more heat protectant and curl your hair with your favorite curling iron using the twist and pull method, so you get an incredibly beachy effect.  
A woman with frizz-free hair and perfect blowout  wearing elegant white suits

Tape-In Hair Extensions: Installation, Maintenance, and Brands

Written by Andrea Haynes

Hair extensions in 2022 are going to be one of the most talked-about trends. From clip-ins to hand-tied wefts, there are specific details that make each kind unique and worth your while. With how much they can add to your look, it’s no wonder they are so popular.

Tape-in extensions especially are worth taking a look at due to their easy installation and beautiful results. They sit right in the middle ground of high and low maintenance and offer curious clients easy wear and natural-looking, blended length.

Can You Put Tape-In Hair Extensions by Yourself? 

A sample of tape-in hair extensions

It can’t be stressed enough that tape-in extensions need to be done by a professional. The angles you have to reach to attach each individual tab can’t be reached on your own.

The process needs to be clean, precise, and well-managed for it to provide optimal results. Make sure to research who offers tape-in extensions in your area. Search extension experts in your area on Instagram and Tiktok.

How to Install Tape-In Extensions

There are a variety of brands to choose from, so check with your stylist about the type of tape in extension they love and trust.

The basic steps you’ll go through are straightforward.

  1.  You will either purchase the hair on your own or go through your stylist. It is ideal to get the hair through your stylist as they can match the tones, any highlights, and the base color in just the right way. Doing this on your own can be extremely confusing.
  2. Once you arrive for your appointment, you’ll get a nice clarifying shampoo and a blow dry. This preps the hair to be clean and helps with the precision element of installing the tape in extension tabs.
  3. After the hair is fully prepped, your stylist will begin to section the hair into a pattern. They will take very thin horizontal sections the same width as the tab of hair they are ready to install.
  4. Each tab has medical-grade glue on it that attaches it to the hair. Sometimes you sandwich the paper-thin section of hair between a top and bottom tab. Others are designed to utilize just one.
  5. The location of the hair extension tabs needs to be precise. It can’t be too close to the scalp or too far away. This is where the precision comes in and it’s important for the outgrowth of your hair.
  6. The extension can last anywhere from 4-6 months depending on your upkeep.

How to Take Care of Tape-In Hair Extensions

There are many ways to properly care for your tape-in hair extensions. Once you experience the beauty of this service and the gorgeous results, following the steps will feel like an easy act of self-care.

  1. Sulfate-free shampoo and conditioner. Sometimes you can fudge on whether you use sulfate-free or regular shampoo. But in this case, sulfate-free is the way to go if you want longevity out of your tape-in extensions.
  2. Wait to shampoo 48 hours after installation. In the meantime, use a quality dry texture spray to refresh your hair.
  3. Avoid putting products directly on the glue tab. When conditioning your hair after your shampoo, you’ll want to keep the product away from the tab where your extension attaches to your hair.
  4. Brushing. Brushing through your tangles becomes more of a delicate process with tape-in extensions. You can gently comb hair up to the tab but avoid brushing the tab or the outgrowth above it. In addition to being gentle, you’ll want to brush more regularly throughout your day. 
  5. Wash less frequently. Extensions of all kinds do well with minimal treatment. Whether it’s shampoo and conditioner, heat protectants, oils, etc. Less is more!
  6. Loose braids. At night, tossing and turning can cause a lot of friction while you sleep, resulting in knots in the morning. Adding in a very loose braid can keep it under control.
  7. Keratin Complex Keratin Treatments. When it’s time to change your extensions, you’ll book a removal service with your stylist. They will go through and gently remove all the extensions then provide a clarifying shampoo. To give your hair the boost it needs after this, getting express keratin by keratin complex is incredible. It plumps each individual hair strand, adding in large amounts of keratin, and is the perfect post-treatment for extensions.
Long smooth blonde hair with extensions

Suggested Brands

There are an overwhelming amount of extension brands to choose from. What’s recommended is to talk with your trusted stylist about the brands they use. Here are some great ones that stand out in 2022:

  1. Stardust Hair Extensions. Created by @roxybeautytouch, these beautiful tape-in extensions are customized to adapt to client needs. Installation takes under an hour as these well-crafted pieces are attached to the hair.
  2. Bellami Hair Extensions. This 100% Remy hairline is hand-crafted with ethical care. It’s the leading brand in extensions and offers a simple and helpful color-matching service.
  3. Tape-In Hair Extensions | Donna Bella Hair. These extensions match beautifully with each individual’s hair. They provide quality-made tape-in extensions and easy installation.

Do Tape-In Extensions Harm Your Hair?

Many women ask this question and for good reason. When using any kind of extension to add length to your hair, there are things to think through regarding how they affect the health of your hair.

The first is what kind of condition is your hair currently in. If your hair feels dry or damaged, it’s a good idea to spend time and effort increasing the health of your hair before getting tape in extensions or extensions of any kind.

To do this, try repair-focused products. Olaplex for example consists of a 9-step system that targets bonds call disulfide bonds. Repairing these bonds increases the strength of the hair, how shiny it is, and its overall integrity.

Doing a series of 3 or 4 keratins on the hair spaced 4-6 weeks apart can rejuvenate hair. The added keratin that goes back into your tresses plumps the hair shaft, making it weighted and healthy, and shiny; ready for those extensions!

Beautiful blonde woman with invisible type-in extensions in her hair

What Curling Iron is Best for Beach Waves?

Written by Andrea Haynes

For years beach waves have been the go-to trend for that “lived-in” hairstyle. It’s an effortless look that fits everyone and can transcend a myriad of clothing choices.

But is “easy” the name of the game with this look?

Women often ask, “how can I create beach waves with a curling iron?” Or “What tool should I use to get beach waves?” There are many YouTube tutorials on the subject and even though “effortless” is the look, the physical mechanics prove to be more difficult.

So how do you get great beach waves? Getting this look perfected comes down to a few things: 1) Tool type, 2) Heat Setting, and 3) Practice with your favorite hot tool.

Read the following tips, tricks, and how-to’s to make sure you curl your hair successfully and get that effortless beach wave look every time.

Gorgeous young brunette woman with beach waves

Best Size Curling Irons and Curling Methods for Beach Waves

Depending on the type and size of the hot tool, there’s this degree of curl that takes you from a tight ringlet to the tousled, irregular waves you naturally get from salty sea water. Most people want something in the middle. Here’s a list of tools that accomplish the range:

  1. The 1” Curling Iron. This size is standard and can provide beautiful, tighter beachy curls. People often ask if they should get the 1”, 1 and ¼ ”, or 1 and ½” barrel size. If your hair texture doesn’t naturally hold a curl well or is very straight, a 1” is your best option. It can wine the waves more tightly while still giving it that relaxed feel. Just don’t curl the ends and it will look great. The brand Olivia Garden has a beautiful 1” curler that works magic on your hair.
  2. The 1 and ½ and the 1 and ¼ inch curling irons. These are also standard sizes but work better for hair that has its own natural curl, is thicker and more weighted, or holds a curl almost too easily. They are great for loose curls with a relaxed feel.
  3. Flat Iron. Not just any flat iron does the trick. The best option for getting natural-looking beach waves is to get a curved-edge flat iron with ceramic or titanium plates. For thicker textures that don’t curl as easily, titanium plates are best. For finer textures, ceramic plates work well.
  4. The Triple Barrel. Anyone who doesn’t love the twist-and-pull method used with curling irons will love the triple barrel. It’s created in a way that makes getting beach waves easy. You simply open the clamp, insert about ½-1” section of hair, then clamp down. Hold, then remove. It works, in the same way, the crimpers of old operated, except due to larger barrel sizes, it gives it a modern feel. 
  5. S-pattern Technique with a Flat Iron. For this, you’ll need a standard-shaped flat iron vs. a curved plate. If a curved plate is all you have, don’t worry, it works too. Taking a ½” thick section of hair, you’re going to bend it just below the root into a “c” shape and press the “c” between the flat iron plates. The next section down you’re going to bend into a “c” shape, but in the opposite direction. Do this all the way down the section of hair you’re holding for beautiful, classy waves.
  6. The Twist and Clamp Method with a Triple Barrel. This method gives your hair the beachiest, wildest, most natural-looking waves. By pinching sections about the size of your finger, you can twist them then lightly clamp your triple barrel down the length of the hair then release. Alternate between this and normal clamping patterns and the hair is stunning. This technique is used by Lo Wheeler Davis for “luxury beach waves.”
  7. The Beach Waver. It’s the most user-friendly iron on the market. There’s no need to twist the curling iron at all as this is a self-turning curling iron. It gently grips the hair toward the bottom and winds it up toward the root.
  8. Curling Wands. This style of the hot tool makes things really fun. There are so many different shapes of wands, and they all create a slightly different type of curl. There are ones that are tapered at one end, others that have a more “square” barreled curve, and more with undulating “bubbles” to create horizontal volume. If you aren’t looking for horizontal volume, which makes the waves fuller going left and right from your face, then stick to a regular cylindrical wand for best results.
Dreamy brunette beauty with beach waves

Heat Setting and Heat Distribution Make a Difference

Heat settings on your hot tools can make a difference with your beach waves.

Have you ever curled your hair in a certain heat setting and your beach waves were limp and didn’t hold the shape well? Your heat setting might need to be adjusted.

  • For finer textures or highlighted hair, the heat setting can be kept low, 280-310.
  • For medium, straighter textures the heat setting can be set around 310-380.
  • But for the coarse, thick texture the heat can be set from 380-410.

TIP 1: While a low heat setting can help prevent damage, there are a couple of things to keep in mind. The first is you should always use a cream-based heat protectant. Sprays work well too, but cream heat protectants coat more heavily, preventing more damage when you’re waving your hair.

TIP 2: The second thing is it’s better to use a higher heat setting and remove the curling iron quickly from the hair vs. a low heat setting and let it sit on the hair for a long period of time. Likewise, with a flat iron, it’s better to have higher heat but fewer passes over the hair. Hot and quick is the way to go for the best beach waves. 

Friendly pensive brunette beauty with beachy hair

What’s the Difference Between a Good Curling Iron and a Low-quality One?

The difference between a quality iron vs. a low-quality iron comes down to a few things. Make sure to look at:

  1. The grip. The clamp of a curling iron or the flat iron should be just right. If it closes too tightly and grips too hard, it will pull the hair and damage it. If it doesn’t close over the hair enough, the shape won’t take well. Good tools have just the right grip.
  2. The type of material it’s made of. For thicker or courser hair, use a titanium iron. ceramic tends to be good for finer hair as it’s gentler in the process.
  3. Heat Settings. What’s important here is not just the heat settings and how hot the tool gets, but how many passes over the hair it takes to get it to either curl or straighten. If your tool is set at 400, there’s no reason it should take more than 1-2 passes over the hair to achieve the desired effect on most textures. If it does, it’s time to upgrade.
  4. How easily it glides. Chances are if you have used a curling iron or flat iron that was the low quality you felt the snag. It’s uncomfortable and makes you wonder, how could something get stuck while I’m siding it down when there’s nothing in the way? If you’ve experienced this, a sort of stuttered motion as you pull your flat iron downward, then it’s time for a change. The same goes for the curling motion. If it’s not smooth, it’s not “it.”
  5. Even heat distribution. Quality hot tools distribute their heat evenly across whatever hair they contact. Tools that do not do this, tend to overheat one spot of your hair. The effects can sometimes look like very limp hair that won’t hold its shape well. Or with flat irons, this can look like fried hair, especially on the ends.

Important Tips and Brands for Perfect Beach Waves

This post contains links to Amazon. The publisher may get paid if You purchase something through the links without additional costs to You.

Here’s a little cheat sheet of tips for getting the perfect beach waves:

  1. Use a cream-based heat protectant. The Brand I recommend for this is Kerastase. My favorite cream heat protectant is the Resistance in the teal bottle and it’s meant to be used every time you blow dry, curl, or flat iron. Plus, the smell is amazing.
  2. The fewest “passes” over the hair will keep it in the best condition. If you need to increase the heat, but do fewer passes over the hair and leave it for less amount of time on the hair, your results will be better and less damaging.
  3. Invest in something good to create beautiful, loose beach waves. Check out the Beachwaver, the Dyson Airwrap, the NuMe Octowand, Olivia Garden 1” Curling Iron, the Lo_Wheeler Davis Triple Barrel Iron, and the Triple Barrel Beach Waver   
  4. Gloss more regularly. That’s right! Instead of getting your gloss every 8-10 weeks, gloss every 4-7 weeks. It keeps the shine, helps seal your cuticle down, and keeps color fresher while you practice getting those loose, big beach waves.
Expressive young brunette woman with beachy waves
Tanned brunette beauty with beachy hair

Olaplex System the Ultimate Guide

Written by Andrea Haynes

Olaplex. Have you heard of it? Been curious to try it? Maybe you’re just confused about when to use each product. Wherever you’re at, this incredible brand has held up as one of the top picks for hair restoration. Salon owners and individuals alike continue to use this system with options 0-9 to restore broken bonds to increase shine, strength, and the health of hair. 

Olaplex works in a unique way. Rather than coating just the outer layer of the hair with the product, Olaplex creates organic chemical reactions in the hair, causing the disulfide bonds to link again, which makes hair healthy, shiny, and rejuvenated. It’s a one-of-a-kind system of linked products. 

Each of the 10 options for restoration contains ingredients that repair disulfide bonds, just in varying degrees. And if you’ve experienced any confusion about when to use each product, take a look at the descriptions below. You’ll have it down to a simple science in no time.

hairstylist performing Olaplex treatment in the salon

Olaplex Options 0-9 What Do They Do?

  1. Olaplex No. 1 Bond-repair agent for the colorist to use. It is the first step in this line-up of nutrient-rich products. This one is used by professional colorists. It’s provided in addition to your color service where a small amount of the formula is put directly into the color or bleach. Then it’s applied to your hair. It keeps the amount of damage from the color or bleach to a minimum,  almost like a buffer.
  2. Olaplex No. 2. Also a bond-repair agent for the colorist to use. Once your color or lightening service has been processed, it’s time to shampoo. With Olaplex, you take time after the shampoo to apply Olaplex No. 2, the “Bond Perfector.” What this means is, more bonds are linked back together, much like in the first step. It’s very important for steps 1 and 2 to be used together. Olaplex is a linked system where each item does its part integrated with the rest. You can still use certain numbers as standalone items, but it’s when you use the system that results reach their potential.
  3. Olaplex No. 3.  The at-home Treatment. This can be thought of as the star of the show. The two products before this one are not at your disposal, but Olaplex No. 3 is. You might be wondering, what does Olaplex No. 3 do? Or how does Olaplex No. 3 work? There’s one thing to keep in mind about this product, it’s not a conditioner, even though it looks like it. The brand wants to make it clear that Olaplex No. 3 is a treatment. What’s the difference between a treatment and a conditioner? A treatment penetrates deeper into the hair strands than a conditioner, so it has a different function. But if you want to have Olaplex No. 3 work optimally, you’ll need to partner it with Olaplex No. 0, which primes the hair to receive Olaplex No. 3. They are a team leaving you with beautiful results.
  4. Olaplex No. 4. The shampoo.  It is color-safe, good for every kind of hair, and has a minimal scent. Lathering it into your hair is a pleasant experience. It has a gel/cream consistency that makes the product spread evenly. The lather is even as well, meaning all parts of the hair can be easily covered and nourished.
  5. Olaplex No. 5. The conditioner. It is meant to be partnered with Olaplex No. 4. This little duo leaves your hair feelings gently cared for. The strands are supple and refreshed after use. In a partnership, Olaplex No. 4 and Olaplex No. 5 can address damaged hair together, packing more of a punch than when used separately. Olaplex No. 5 has a creamy consistency and evenly coats the hair from root to tip for easy application.
  6. Olaplex No. 6 The leave-in conditioner for home use. It’s proudly called “The Bond Smoother” by Olaplex. Think of it as a conditioner you get to leave in your hair. But think of it as more than just a conditioner due to its unique properties and abilities. It Is moisture-focused, which means curly hair will benefit and experience more definition. It also contains the molecule for bond repair, meaning your hair will experience protection from the things that create damage. Use it just after you shower while your hair is damp or reapply it to freshen your locks.
  7. Olaplex No. 7 The Oil. Silky, lightweight, and special due to its U.V. protection, the Olaplex No. 7 is essential in your everyday routine. Remember that the foundation of hair product care is your shampoo, conditioner, oil, and heat protectant. When these 4 are right, everything else falls into the place. You can then begin to look at styling products. A good oil though is essential for the everyday health of your hair.
  8. Olaplex No. 8 The at-home hair mask. Olaplex No. 8 is a hair mask to use 1-2 times per week. It provides additional support for hair that needs healing. Think bleach blondes, chemically treated, overly dry hair due to winter air. Or maybe your hair is in good shape and you’d like to keep it that way. Masks provide this additional support to give you that extra edge over the damage.
  9. Olaplex No. 9 Bond Protector Nourishing Hair Serum. The latest innovation in the Olaplex family was created with patented OLAPLEX Bond Building Technology to protect dry, damaged hair from heat, pollution, and future damage. It makes your hair visibly healthier, reduces static, and protects your style. Apply it to clean, towel-dried hair.
  10. Olaplex No. 0 The Primer. This product is used in unison with Olaplex No. 3. The duo function as a treatment to restore damaged parts of the hair, increase shine, and can guarantee that it’s “Scientifically proven: 68% more repair and 3x stronger hair when used as a two-part system in just one use.”

What Makes Olaplex No. 3 So Special?

Treatments are products meant to take things to the next level. While conditioners, leave-in creams, styling products, and heat protectants all serve their functions, treatments are designed to penetrate the cuticle more deeply or target a specific area (think scalp treatments). With Olaplex No. 3 Treatment, your hair will receive a lot of benefits.

What Does Olaplex No. 3 Do?

It works in partnership with the bond-repair primer Olaplex No. 1. This primer sets the stage for Olaplex No. 3 to optimally perform. They will target those broken bonds and heal them, leaving your hair feeling different, healthier, and stronger.

When Should I Use Olaplex No. 3?

It’s a pre-shampoo treatment meant to be left for a minimum of 10 minutes, then you shampoo and condition it as normal. Or when you have the time, you can leave it for 90 minutes or so.

For those who haven’t experienced pre-shampoo treatments, now is the time. They produce incredible results. It’s easy to forget that shampoo itself as well as the water dries out your hair. By applying a pre-treatment, you’ve immediately minimized the habit that causes damage to your hair without you realizing it. Years ago, the company Kerastase came out with one that contained elements of the iris flower. The product was inventive and there was a noticeable difference even after just one use. But the concept was hard to sell at the time. Adding one more item to the shampoo routine seemed tedious.

Now, however, more appreciation is being promoted concerning how you nurture your hair and scalp. This is one way to do that. To slow down, take that time to apply your Olaplex No. 3 treatment, then move on to the shampoo and conditioner. It’s so unique, you have to try it for yourself to experience the wonder and enjoy this act of self-love.

Who is Olaplex No. 3 Good For?

While anyone can use this product to maintain the health of their hair, there are certain targets this product is specifically designed for.

For people with bleached or chemically treated hair, or using permanent color, this product is best. With its unique ability to repair broken bonds, targeting the chemical services that break bonds the most is important. 

The strongest bonds in your hair are broken each time heat, bleach, or hair color is applied. But restoring strength and integrity is possible with Olaplex. It’s their life’s work! 

How Do You Apply Olaplex No. 3?

For best practices with this product, apply it to damp hair. You can spritz it or wet it, but make sure to towel dry so the product doesn’t run off with excess water.

You also can apply it on dirty hair but with a reason. If your hair hasn’t been washed in a week and is caked with root touch-up spray, hairspray, volumizing powder, tons of texture spray, or dry shampoo, do a quick wash first. This way Olaplex No. 3 can get directly onto the hair strands and do what it does best. 

beautiful hair dyed hair in a beauty salon

The Ultimate Guide to Keratin Treatments

Written by Andrea Haynes

When you type into google “what is a keratin treatment” a couple of things happen. Right away you’ll see an article promoting an at-home treatment like nothing you’ve seen before. Then as your eyes scroll down, you’ll see some dreaded headline suggesting things aren’t what they seem with this product. And the further down you go, the more confusing it gets.

This is the exact scenario I want to help you avoid. By gathering a bit of accurate knowledge, giving you the inside view of certain brands, and helping you understand the difference between the buzzword “keratin” and the actual treatment, your decision to get one will be crystal clear. So where do we begin?

beautiful young woman with keratin treated long hair

The Buzz Word “Keratin” Vs. The Actual Keratin Treatment

This really is the best place to start. Navigating the complex sea of all things keratin gets simpler once you understand the difference between a topical product claiming to be keratin-infused, and the actual treatments on the market.

The main takeaway is that products containing the protein keratin place the molecules onto the shaft of the hair while treatments embed the molecules into the deeper layers of the hair, like how color molecules penetrate the hair for longer-lasting, more effective results.

Products Containing Keratin

It’s such a buzzword, that there will be over-the-counter and luxury brands alike advertising keratin. You’ll find shampoos, conditioners, serums, and supplements containing this protein. 

Should you avoid or purchase products containing keratin? Some studies have found individuals taking a supplement containing keratin did experience lovely results for their hair and nails vs. individuals in the same study who took the placebo. Similarly, positive results were experienced by individuals who used some types of keratin-infused shampoos.  

Products containing keratin can be helpful, but there may be some trial and error. The real question is, do products that spread keratin protein on the outer shaft of the hair affect it as much as an official keratin treatment?

beautiful brunette woman with straight long hair

How Keratin Treatments Work Vs. Topical Keratin Products

Products with keratin in them place the molecules on the outer shaft of the hair, meaning the molecules don’t stay for long. Keratin treatments you receive in a salon contain very tiny molecules that can go deeper inside the hair shaft for semi-permanent results lasting months. Topical products don’t compare because they aren’t designed to do the same thing.

Keratin treatments heal the hair from the inside out. Products containing the protein, add shine and can seal down the cuticle for short periods before the product washes off the shaft. They affect the hair from the outside in and do not produce the same results.  

With the official keratin treatments, the results are worth it. From my own experience, I have seen even unexpected hair health changes from the brand I use, Express Keratin by Keratin Complex when it’s applied consistently and in a pattern.

Keratin Treatment Results from Personal Experience

When I was newly introduced to express keratins, they were the new and upcoming trend on the market. But they weren’t big yet, meaning no one knew if the brand lived up to the hype. Isn’t this what we always wonder about products? They were claiming to revolutionize keratins up to that point.

We were taught in training how to apply them and what to expect. The results would include de-frizzed hair, faster blow-dry time, smoother cuticles for shine, curls that would be softer and less wild, and overall manageability that would provide ease in the morning routine. No one has the time or energy to fight with their hair during their morning self-care rituals or throughout the day.

So we were taught. But what were the results?

One of my clients enjoyed her first one so much, that she came back for her second within 4 weeks. Then her third within another 4 weeks. She was a highlighted bleach blonde with frail hair and very little curl. But the woman who started 12 weeks earlier, did not have the same hair as the woman I worked with post keratin appointments. The hair that had been so fine and brittle, completely stripped of keratin due to bleaching, was now denser and stronger and laid beautifully against her head and shoulders.

There was this healthy “weighted” quality to it that kept it from looking “see-through.” She could style it without worrying about flyways. She even finally felt confident to grow it out. So that’s what we did. She was hooked and so was I.

young woman with keratin straightening hair

Who is Keratin Treatments Good for?

After experiencing these results, skip forward a year and almost every one of my clients was now using the Express Keratin Treatments by Keratin Complex. It lived up to the hype and then went beyond what was expected.

It worked across the board for anyone experiencing damaged hair or uncontrollable frizz. Clients with bleached hair that was fine, or thick, wavy frizzy hair that was down to their waists. Some had mid-range curly hair that was so dry topical products couldn’t do the trick. Everyone got on Keratins, and everyone got results that gave them ease and manageability in their lives. They got the results products couldn’t provide.

Related Article

There are So Many Types, Which One is Right for You?

The 3 most popular ones are Keratin by Keratin Complex, Express Keratin by Keratin Complex, and the Brazilian Blowout.

But now there are a variety of types. Like the vegan at-home kit by Gussi. The larger brands have come out with types that vary in the degree they “affect the curl” based on the temperature of the flat iron or how long you let the product sit on the hair.

I’m going to discuss the first three and why you might want to work with one of these.

young woman with straight shiny hair

The Difference Between the Full Keratin and the Express Keratin by Keratin Complex

Determining which keratin to get really comes down to budget, effects of damage, and longevity. For highlighted, damaged blondes the Express would be best as it can build in the protein over time. If you choose Keratin Complex, schedule your first three appointments four weeks apart. This allows the protein to build on itself and makes your hair strong and healthy. After the first 3, do them as needed or seasonally.

You might be wondering why someone would choose the Brazilian blowout. I haven’t worked with this brand but do want to say I’ve heard it affects the texture of the hair more than Keratin Complex. This could be because of the ingredients in the formula. Some people love the results while others do not.  

If you’re looking for smoothness over health, you could try the Brazilian blowout. There’s also no waiting period after your service is complete. With The Express Keratin by Keratin Complex, you’ll need to wait 8 hours before tying it back, pinning it, or wearing it up.  

I work exclusively with Keratin Complex due to the incredible experience I’ve had with it. When I recommend a Keratin, I recommend this one. I trust it. I trust the results and it makes me happy to see people give that sigh of relief because they control their hair, not the other way around.

woman with beautiful straightened hair

Is a Keratin Treatment a Straightening Treatment? 

Chemical services that straighten or curl (as with a perm) hair must break chemical bonds first, then rebuild them in the desired shape. Japanese Thermal Straightening is an example of straightening treatment. Keratins ARE NOT straightening treatments, they only smooth and add shine and health.

With the terms Keratin, Brazillian blowout, express keratin, and in-home keratin plus products containing keratin, things can get confusing.

Here’s the takeaway with the terms: Keratin is a generic word for treatments that smooth the cuticle and provides shine and health for your hair. Brazillian blowout is a TYPE of keratin treatment. The Express Keratin by Keratin complex is also a type of keratin treatment. Products that contain the protein keratin, are NOT keratin treatments.

For individuals looking to address thick curls and frizz but have generally healthy hair, choose the original Keratin Treatment. It takes 3+ hours to apply and there is a 72-hour wait period after the application is complete, but it lasts 6+ months.

Watch out for blogs that use these terms interchangeably. Unfortunately, the information can be misleading and won’t help you make an informed decision.

beautiful model with smooth hair

AfterCare for Your Keratin Treatment

This part is easy. To care for your keratin and extend the results, purchase shampoos that are sulfate and sodium-chloride-free. Chlorides are mostly salts that are highly reactive and can strip hair easily.

You’ll also want to follow the guidelines for the keratins that have a waiting period post-service. This means if they recommend not putting your hair up, putting in clips, wearing a ponytail, or shampooing for a certain amount of time, it’s best to follow this.

This post contains links to Amazon. The publisher may get paid if You purchase something through the links without additional costs to You.

Here are some trusted brands to preserve the life of your keratin:

  1. Oribe Gold Lust shampoo and conditioner.
  2. Kerastase Bain Fluidealiste shampoo and conditioner.
  3. Olaplex Signature shampoo and conditioner

How are you feeling now? There is a lot to understand about keratins but remember to enjoy the process. Making an informed decision doesn’t have to be so bad. You can get the knowledge you deserve, take the time you need to decide, then treat yourself to a wonderful service designed to create health, strength, and beauty for your hair.

beautiful brunette with straight long hair